Yes, I’m trying to be somewhat healthy during quarantine, so I eat a salad every once in a while. I love creamy salad dressings because they add so much texture and flavor to greens. This lemon yogurt dressing adds a ton of flavor without mayonnaise. I love it on a simple salad with spring mix greens, garbanzo beans, avocado, and roasted sweet potato. It’s also delicious as a dip for fresh veggies and pita bread!
Ingredients
2 tbs plain yogurt (I used regular whole milk yogurt, but feel l free to use Greek yogurt. I just wouldn’t use low fat yogurt for this because this dressing should be creamy, not sad.)
1 tbs olive oil
Juice of 1/2 lemon
2 cloves garlic, minced
1 tbs grated Parmesan cheese
Salt and pepper to taste
Directions
Whisk all ingredients together until combined and drizzle over your salad. Mwah!
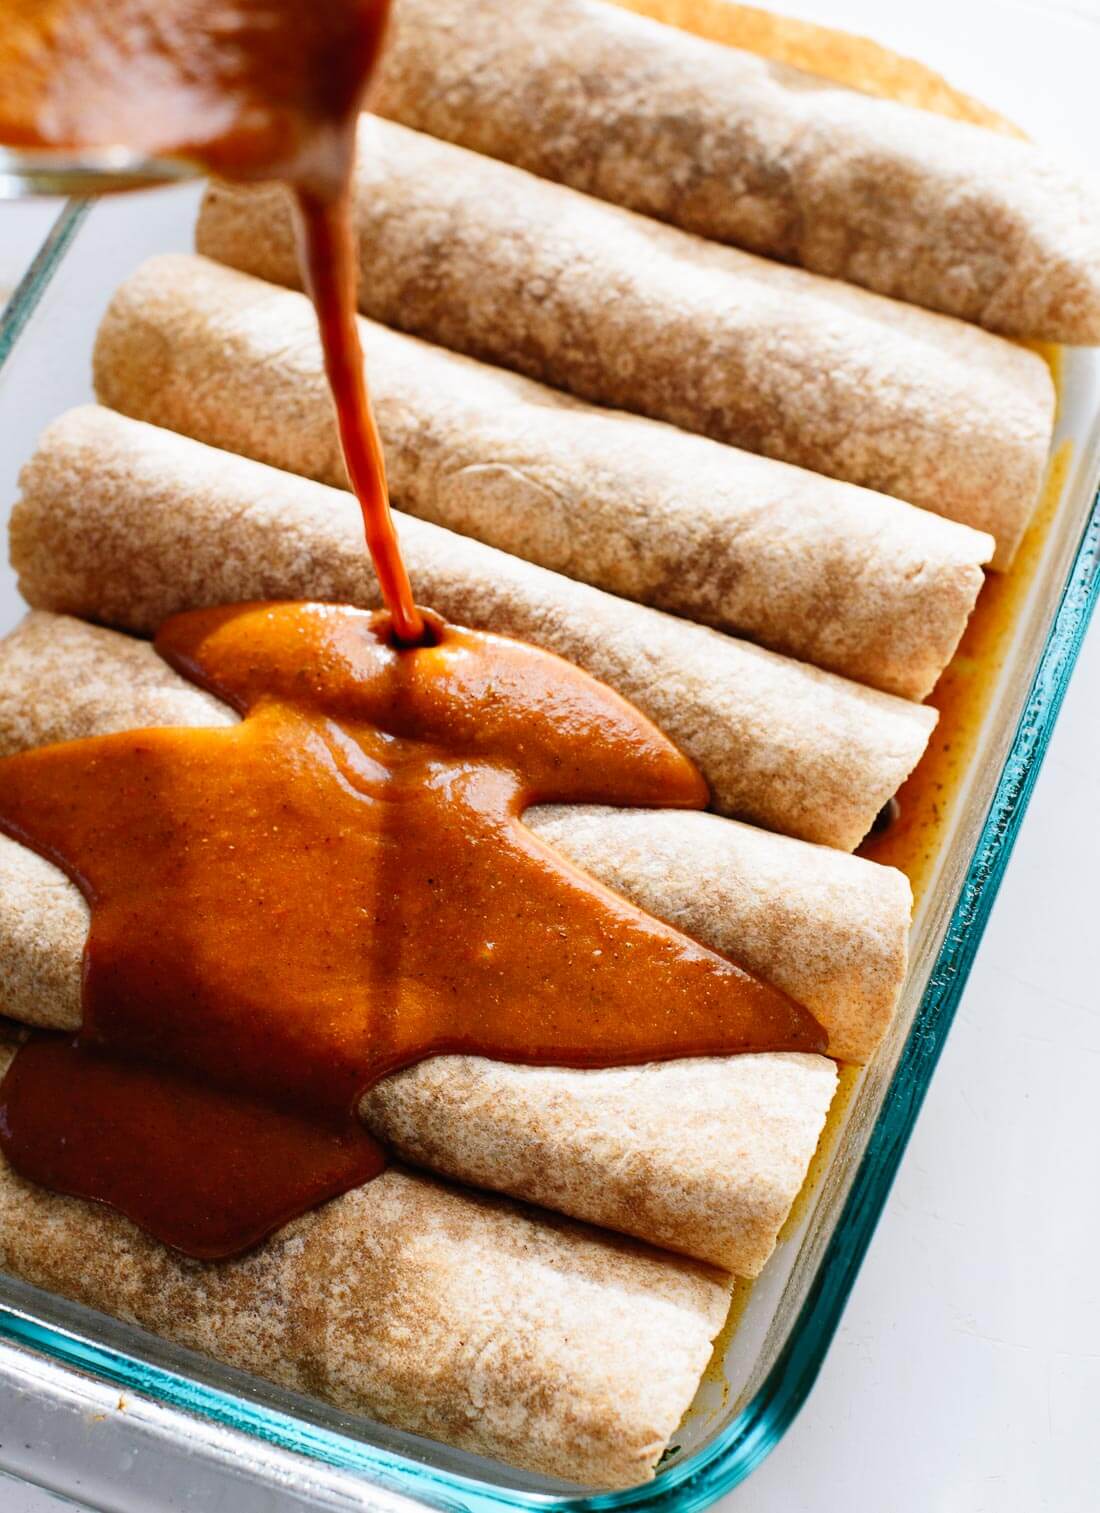
Today’s blog entry isn’t about an original recipe, but one that I stumbled upon on my search for an enchilada sauce. Cookie + Kate’s recipe for the most perfect, easy enchilada sauce is bomb. It’s so good that I’m kinda mad that I didn’t come up with this recipe myself. It is tomato and spice and everything nice, and just too perfect to change. And you don’t have to use it exclusively on enchiladas, either. So far, I have used it to add zing and flavor depth to scrambled eggs and omelets, chicken, nachos, fries, breakfast burritos, and rice! The best part? It’s made with all vegetarian ingredients, most of which you probably already have in your pantry. And if you don’t, they’re all easy to find at your local grocery store: olive oil, any kind of flour (I’ve even used pancake mix out of desperation and it still turned out PERFECT), chili powder, cumin, garlic powder, dried oregano, salt, pepper, cinnamon, tomato paste, vegetable broth, and apple cider vinegar.
Ohhhhh mama. Image courtesy of Cookie + Kate.
You’re only 12 ingredients away from heaven. Check out Cookie + Kate’s recipe here. That’s all.
Here’s another recipe for those quarantine panic buy days when everything flies off the shelves, including flour. For this recipe, I enlisted my trusty cast-iron skillet yet again to make a peach cobbler with pancake mix instead of all-purpose flour. Buttery, sweet, fruity, crunchy, and chewy, this peach cobbler really hits the spot. Top it off with coconut cream, whipped cream, or ice cream, or just enjoy it on its own.
Recipe Information
Servings: 12
Prep time: 10 minutes; cook time: 40 minutes
You will need: cast-iron skillet (or medium saucepan + 9 x 9 inch baking pan), whisk, measuring cups, measuring spoons
29 oz can sliced peaches, drained. Reserve 1/4 cup of juice.
1/2 cup quick oats
1/2 tsp salt
1 tsp cinnamon
Optional: coconut milk or cream, whipped cream, or ice cream for topping
Directions
Preheat oven to 375 degrees.
Melt 1 stick unsalted butter in cast-iron skillet over medium heat.
Once butter is melted, remove from heat.
Whisk in 1 cup pancake mix or flour mixture, 1/2 cup sugar, and 1 cup milk until combined.
Add peaches to pancake mixture, arrange the slices evenly on the skillet.
Make the streusel topping.
Mix 1 stick unsalted butter, 1 cup pancake mix, quick oats, salt, and cinnamon until combined. use your hands to break this mixture up into chunks.
Arrange streusel evenly onto the batter and peaches.
Bake for 35-40 minutes, or until the streusel is golden brown. Drizzle reserved peach juice on the cobbler immediately after it is removed from the oven.
Serve warm and top with coconut milk, coconut cream, whipped cream, or ice cream.
Tostitos Hint of Lime tortilla chips are my go-to snack if I’m craving something crunchy, salty, and zesty. And now in quarantine, I have figured out a way to incorporate one of my favorite snacks into a meal, basically an excuse to each these chips for dinner. Introducing Tostitos Hint of Lime Chips-crusted salmon! I also added a spicy jicama and mango salad on the side because, you know, health is important. This is a quick and easy lunch or dinner and looks like something you’d pay $21.99 for at a restaurant (OMG remember eating in restaurants? WITH FRIENDS?!). I cooked the salmon using my trusty cast-iron skillet, but you can use a frying pan and foil-lined baking sheet if you don’t have a cast-iron skillet on hand.
Recipe Information
Prep time: 15 minutes; cooking time: 15 minutes
Servings: 4
You will need: cast-iron skillet (or frying pan and foil-lined baking sheet), medium salad bowl, whisk, knife, cutting board
Ingredients
For the Salmon
12 oz salmon fillet, sliced into four 3 oz fillets
2 cups crushed Tostitos Hint of Lime tortilla chips
4 tbs canola oil, divided
Pinch of salt
Juice of 1 lime
For the Spicy Jicama and Mango Salad
1 medium jicama, cut into 1/2 inch cubes
1 medium mango, cut into 1/2 inch cubes
1 medium jalapeno, minced
4 cups spring mix salad
3 tbs olive oil
2 tbs lime juice
3 cloves garlic, minced
1 tsp salt
1 tsp ground black pepper
Directions
Preheat your oven to 425 degrees. If you are using a cast-iron skillet, it on your stove over medium high heat.
Brush 2 tbs canola oil on the meat of the salmon fillets, leave the skin side without oil. Add a pinch of salt to each fillet. Remember, each fillet will be covered in tortilla chips, so go easy on the salt.
Press crushed Tostitos Hint of Lime tortilla chips onto the meat of each salmon fillet.
Once smoking, remove cast-iron skillet from heat and add 2 tbs canola oil.
Place salmon fillets skin-side down on the heated cast-iron skillet. This will yield delicious crispy salmon skin.
Place cast-iron skillet in the oven and bake for 6 minutes.
After 6 minutes, switch the oven to broil on high and cook salmon for an additional 2-3 minutes, or until tortilla crust is golden brown.
Remove salmon from the oven and drizzle each fillet with lime juice. Leave in the cast-iron skillet for at least ten minutes while you make the salad.
Whisk together olive oil, 2 tbs lime juice, garlic, salt, and pepper. Toss together jicama, mango, jalapeno, and spring mix.
Serve the salmon with the salad and enjoy the zesty, crunchy, savory, goodness!
When I’m stressed or feeling down or overwhelmed, I bake (desserts). When the COVID-19 lockdown began, I had the hardest time finding flour because everyone in America was baking bread and instagramming it. The only items left in baking aisles were pancake and box cake mixes. So, I grabbed a Pillsbury moist supreme cake mix and took it up 10 notches with other items leftover on shelves: coconut cream powder, coconut milk, and a seven-minute fluffy marshmallow-y frosting sprinkled with a generous amount of coconut flakes. The result is the fluffiest, creamiest, coconuttiest cake that satisfies the strongest quarantine sweet tooth. The frosting recipe is adapted from King Arthur Flour’s seven-minute frosting recipe; I just omitted cream of tartar because I didn’t have any on hand, and added coconut cream powder.
Recipe Information
Servings: 8-10
Time: 15 minute prep; 45 minutes baking/cooking
You will need: Hand mixer, medium bowl, 8 inch baking pan, rubber spatula, serrated knife
Ingredients
For the cake
1 box white cake mix (any brand will do; I used Pillsbury)
2 tbs coconut cream powder (available at Asian supermarkets or online)
3 large eggs
1/2 cup canola oil
1 cup water
Baking spray (or oil and flour)
1/2 cup coconut milk (full fat works best for this, but you can use any kind of coconut milk you like)
Prepare box cake according to the manufacturer’s instructions.
Mix 2 tbs coconut cream powder into the cake batter before pouring into the cake pan.
Pour cake mix into oiled pan and bake according to the manufacturer’s instructions.
After baking, allow the cake to cool completely at room temperature.
Remove cake from pan and cut in half horizontally using a serrated knife to create a two-layered cake.
Pour 1/4 cup coconut milk onto each layer. Let the cake soak up the coconut milk while you prepare the frosting.
Prepare a double boiler for the frosting. Fill a medium saucepan halfway with water and simmer over medium heat.
While waiting for the water to come to a simmer, combine sugar, water, egg whites, corn syrup, and salt in a medium mixing bowl. Mix with a hand mixer for 30 seconds.
Set the bowl of frosting mix over the pot of simmering water. Make sure the bowl does not touch the water. Continue to beat the mixture with the hand mixer until stiff peaks form, about 7-9 minutes.
Remove from heat and add 1/4 cup coconut cream powder. Beat with hand mixer until combined.
Time to assemble the cake! Add about 1/2 cup frosting to one of the cake layers. Place the second layer on top of the first.
It really is. Indulgent, buttery, creamy, savory, with just a hint of vegetables to make you feel slightly less guilty about getting seconds or thirds … what’s not to love? This chicken pot pie is baked in a 15-inch cast-iron skillet because I’m too lazy to wash both a pot and a baking dish. Of course, if you’re willing or a psychopath or just don’t have a cast-iron skillet, you can prepare the filling in a pot on the stove and then transfer it into a baking dish. However you decide to bake it, you’ll get the most perfect bite of chicken pot pie. This recipe amounts to about 12 servings, but if you’re like me it’s actually 6 servings.
*drool*
Recipe Information
12 servings
10 minutes to prep, 10 minutes of stove top cooking, 30-35 minutes for baking
You will need: a 15-inch cast-iron skillet (or large pot and baking dish), whisk, mixing spoon, food processor (or cheese grater and medium mixing bowl), saran wrap, knife, chopping board, small bowl, large appetite
Ingredients
For the pie crust – TIP: This can be made a day or two ahead!
2 1/2 cups all-purpose flour (you can substitute with any type of flour or pancake mix if your grocery store is out of flour)
1 tsp salt
1 cup unsalted butter (2 sticks), frozen, cubed if you use a food processor or shredded using a cheese grater if you don’t have a food processor
1/2 cup cold water
For the filling
4 cloves garlic, minced
1 medium sweet onion, diced
1 tbs canola oil
1 stick unsalted butter
1/2 cup all-purpose flour (can sub with pancake mix)
3 cups whole milk (can sub with 2% milk or cashew/soy milk) at room temperature
Leaves from 5 sprigs of fresh thyme
1 tbs dried oregano
1 tsp ground black pepper
1 tbs salt
1 tbs nutritional yeast or grated Parmesan cheese (optional)
4-5 medium red potatoes, cut into 1/2 inch cubes and par-boiled
2 cups shredded rotisserie chicken (I used Costco rotisserie chicken because it’s the best)
12 oz bag frozen green peas and carrots, steamed in the microwave
Egg wash, 1 large egg + 1 tbs water whisked together
Directions
Make the pie crust.
With a food processor:
Add flour, cubed frozen butter, and salt to a food processor. Pulse until combined.
Turn the food processor setting to mix and slowly add cold water until a dough forms
Or without a food processor:
Combine flour and salt in a medium mixing bowl.
Shred frozen butter using a cheese grater directly into the flour and salt mixture. Stir to combine thoroughly, until all the butter pieces are coated in flour.
Slowly mix in cold water until incorporated and a dough forms.
Form the dough into a disk and cover tightly and completely with saran wrap.
Let dough rest in the fridge for at least 30 minutes, up to two days.
Preheat oven to 425 degrees.
Heat canola oil in a 15-inch cast-iron skillet or large pot over medium heat.
Add garlic and onions. Saute until garlic is slightly browned and onions are translucent. Remove from skillet or pot and set aside in a small bowl.
Melt stick of butter in the skillet or pot.
Add flour and whisk over medium-low heat until butter and flour are combined. A soft, tan dough will form.
Turn heat up to medium. Add milk, one cup at a time, and whisk until combined and the sauce thickens, about 5 minutes.
Add sauteed onion and garlic, fresh thyme, dried oregano, ground black pepper, salt, and nutritional yeast or Parmesan cheese. Whisk until combined.
Fold in potatoes, chicken, and green peas and carrots.
Remove from heat. Transfer filling into medium baking dish if it was cooked in a pot.
Roll out pie dough until it is 1/4 inch thick.
Cover skillet or baking dish with pie crust. Cut 4-6 one-inch slits in the middle of the dough to let the steam escape while baking.
Brush pie crust with egg wash.
Bake the pot pie for 30-35 minutes, or until the crust is golden brown and filling sizzles.
I love my full-size bed. No, I looooove it. It’s comfy, it has a memory foam top that does that imprint thing when I press my hand on it, it’s where I want to be after a long day of work. After spending the majority of my life sleeping on twin-size and extra long twin-size beds, I was dying for an upgrade when I finally got my own apartment. There’s just one problem, and it’s a big one: my full-size sanctuary takes up 1/3 of my apartment. That’s right. 1/3. Of. My. Entire. Apartment. That’s how small my apartment is because when you choose to work for a non-profit in one of the most expensive cities in the country, that’s what you can afford.
The amount of space that my bed takes up never actually bothered me before the pandemic lockdown, to be honest. I was just beyond happy to have a place of my own with a wider bed, one that I didn’t fall out of when I rolled over. But now that I’m stuck inside, it’s a problem that I’m dying to solve.
So, I’ve been doing some research on bed options for small spaces. Here are the pros and cons of what I got so far:
SOFA BEDS
Pros: The ultimate double duty space saver, a two-for-one deal! A sofa bed could transform a bedroom into a living room, and vice versa, in a matter of minutes. While the sofa beds I remember from my childhood were ugly, bulky things, but the designs are so chic nowadays.
This beautiful sofa bed by Article has a memory foam mattress. The velvet upholstery is a stylish bonus.
Cons: The bar. OH GOD. THE BAR. And I don’t know about you, but pulling out a mattress from a sofa frame is a huge pain in the ass. Who wants to do that at the end of a long day? I would probably end up sleeping on the sofa instead of the bed.
That one Seinfeld episode pretty much sums it up.
MURPHY BEDS
First of all, what the hell is a murphy bed, you ask? I haven’t heard of such a thing before I googled it 20 minutes before I wrote this post. A murphy bed is a hidden bed; it folds up into a framed cavity when not in use. Some beds incorporate a desk or sofa, like the example by Expand Furniture, below. Yay for double-duty space savers!
Check out this modern murphy bed by Expand Furniture. It disappears! Also, I’m so proud of myself for figuring out how to use the “compare image” block on WordPress. Yay me!
Pros: It serves the double duty function of a sofa bed, but without that dreadful bar that stabs you in the back. And good news for me; I can purchase a murphy bed frame without having to get rid of that mattress I love so much.
Cons: This piece of furniture is kinda … BIG. I have no idea how I would possibly bring it into my apartment building, let alone my tiny apartment unit. And, when the bed is hidden, I’m not too sure about having a giant piece of rectangular furniture–that is supposed to serve the function of a wall–not blend in with my existing wall; sounds like that would be an eyesore. Plus, I wonder how difficult it is to fold an entire bed into a wall. Hmmm … more research is needed on this one, but it’s a contender.
DAY BEDS
Pros: Ahhh the perfect blend of a bed and a couch without having to lift a finger to transform it. It fits right into the inherent bedroom/living room combo of a studio apartment.
Cons: It’s too narrow! Remember, my life changed when I upgraded from a twin- to a full-bed. Who would want to go back?
Alas, my search for the perfect bed for my small apartment continues … What’s your favorite bed frame solution for small spaces? Do you like the adaptability and hidden components of sofa or murphy beds? Or do you prefer to plop right on a day bed without having to pull out a mattress?
I’m K. I live in a tiny studio apartment in Los Angeles. Like all of you, the COVID-19 pandemic has turned my world upside down. Suddenly, I can no longer see my family, friends, and coworkers in person; and now, my main dinner companion is my cat.
As is the case with most–or at least, I hope so–I am doing my best to stay inside my own apartment to avoid catching the virus or worse: spread it unknowingly. As such, my tiny apartment has become everything to me: my bedroom/living room/kitchen/restaurant/office/gym (even though gyms have reopened in L.A., I’m not rushing to my gym to share sweaty weights and yoga mats with others just yet)/the most local of bars during Zoom happy hours. And I must say, after quarantine-ing for almost four months now, I’m getting kinda claustrophobic. So, I am turning to Google, Pinterest, and blogs to gather creative, space-saving ideas.
So, why make my findings from the internet public? I’m sure most of us are trying to make the most out of our homes; and those of us living in studio or 1-bedroom apartments or with roommates have to get extra creative. I want to exchange ideas with others who are seeking extra space within limited square footage AND share my findings, thoughts, and ideas with you, too. So, let’s make the most of our tiny living spaces, our everyplaces!